Sunday, October 13, 2024

 My latest crafting passion is Kumihimo - a Japanese braiding technique with beautoful results.

Here are a few of my creations:


Sunday, June 2, 2013

Painted Tiles - Crafts N Cocktails 5/31/2013

Painted Tiles - Crafts N Cocktails

Another successful Crafts N Cocktails night with the girls! I experimented with this craft quite a bit before having the girls over. I first learned about this form of artwork on the TV program, The Chew, as part of Clinton's Craft Corner. 
Clinton's Craft Corner: Ink Dye Coasters
Clinton demonstrated spraying the tile with rubbing alcohol and then dropping ink paint on the tile to make random designs.
So, off I went to Michael's to find the alcohol inks:
Tim Holtz Adirondack Alcohol Inks
I found it very hard to control the paint, as it kept moving and spreading beyond my desired look. But, the inks were vibrant and even the random designs came out pretty. 

My first designs:
I did some more research on Pinterest and found a few tutorials for using these alcohol inks and learned a few more techniques. These techniques use a blending medium, which gives a similar effect as spray with rubbing alcohol. But, placing the ink and medium on a felt pad first allows you to control the effects a little better. 

Video Tutorial #1 from Two Peas in a Bucket

Video Tutorial #2 from Two Peas in a Bucket

Here's a link to someone else's blog with step by step directions. Very nice!

So, this time I went to Joann's to find the felt and stamper. 
Although, these techniques are geared towards using them on glossy card stock paper or on clear plastic or glass, it worked pretty well on the tiles too and I liked that I could control the designs a little better using the felt stamper. I also like the look of stamping on top of the background colors. But, I had trouble rubbing off the ink to leave a "negative" or white impression of the stamp. It just smudged the ink. 
My tiles using these other techniques:

Commence Craft Night:
The girls arrived and after the wine is poured and some snacks were served, the art work began. 
I demonstrated the few techniques I learned and encouraged them to put their own spin on it, which they did! As you can see, everyone's art was unique and they all came out great! 

Tina's Designs using the stripe technique:
Lana used a couple of different techniques and did a freehand butterfly:
Barbara's Designs (Love how she depicted the ocean):
Beth blended color with metallic silver for this look:
Marie got very creative to make Bamboo to match her daughter's decor:
It was so much fun to see how unique and creative everyone was with their artwork. And, by the way, it's so easy a 6 year old can do it!
Also, keep in mind that you are not limited to doing this on tiles. Although I have some larger tiles that I thought I might try to make a larger design for hang or display. 

Let me know if you try these alcohol inks and how it turns out. Have fun! 
We did!


Saturday, April 13, 2013

April 12, 2013 – Crafts ‘n Cocktails


As usual I searched Pinterest for ideas for this craft night and came up with some different techniques for painting on glass. Here are a couple of sites I found:

So, I went to the dollar store and got a few glasses and vases. I also gathered up some empty mason jars I had lying around, got some inexpensive acrylic paint in pretty colors (Michael’s had Americana on sale for 50 cents each).

We used Q tips to paint dots on glasses (no artistc skills needed):

For the vases, I just poured the paint inside and swirled it around to coat evenly. Then turned it upside down to drain out the excess. We left the vases to dry overnight. To cure the paint on the glasses, we put them in a cold oven. Then preheated to 350. Once the oven was up to temperature, we turned it off and left the glasses in the oven to cool for 30 minutes. The acrylic paint was matte to the touch, so I’m not real confident that it won’t wear off. Perhaps, we did “cure” it long enough in the oven. I put them back in the oven for another 20 minutes the next day. We’ll see how they hold up.  

Marie decorated a jar she’ll use for sugar. It came out looking like impressionist flowers. Really pretty!
Beth painted her “therapy” wine glass:


My finished glasses:

My finished vase grouping:


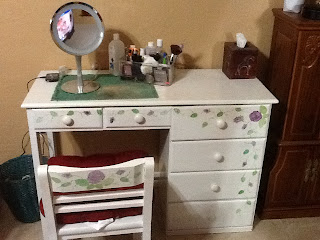
DIY Project - Painted Vanity Desk


Just like the chair in a previous post, I also had a desk that I wanted to move into my bedroom to use as makeup vanity, but I needed to paint it to match the décor.

Before (first paint job I did about 15 years ago):


I had heard about chalk paint and wanted to have that type of antique finish. But, the chalk paint is so expensive and I already had left over red paint from the accent wall in the bedroom. So, after some research, I learned that you can make your own chalk paint by mixing grout into the paint. So, I tried it. I found the paint really thickened up as I progressed through the project. So, I added some water as I went. But, I’m very happy with the end product. I used a wax finish on the red parts. But, I put a poly varnish on the desk top for added durability.

After (I also used the chalk paint on the mirror and sanded it to give it an old look):


My 2012 Christmas Crafts:


Here’s a list of the crafts I did for Christmas gifts this year:

    For my nephews, I crocheted alligator scarves:
    http://brightandshiny-lovelyandgood.blogspot.com/2011/08/crochet-gator-scarf-for-kids.html


    I LOVE the purse organizer I made for myself. It makes it so easy to change purses – just lift it out of one purse and insert it into another in a snap!
    Purse Organizer


    For the ladies, I made wallets, purse organizers, and sashay scarves (mentioned in an earlier post). I found most of these patterns on Pinterest.


    I made a “tool” organizer for my dad:
    Mug Organizer (I made my Dad’s a little larger, using a large margarine tub. This is not the one I made for Dad)


    Happy Homemade Holidays!


    February 22, 2013 – Crafts ‘n Cocktails


    We met back at Beth’s house. I found this craft on, you guessed it – Pinterest. I don’t have any little girls to make these for, but they are so cute.
    I bought some iron on embellishments, we could use as well. 


    Crafts ‘n Cocktails: July 2012 – Oct 1012


    July 6, 2012 – Crafts ‘n Cocktails

    Our gathering was at Beth’s house this time and we painted ceramic village pieces I picked up at Michael's. 


    Sept. 21, 2012 – Crafts ‘n Cocktails

    This time we met at my house again. This was my favorite craft to date. I found this idea on Pinterest:
    I told everyone to bring some inexpensive socks - a pair in white and another pair for the "sweater" like an argyle pattern. 
    I gathered up buttons and embellishments. Got out the glue gun and we were off. We filled the bottoms with rice and the rest with polyfil. 

    Everyone’s snowmen came out great!

    Halloween Crafts ‘n Cocktails:

    Marie found this one on Pinterest:


    Craft on!